Just thought I would pop up a little post and let you all know that I am now officially over on tumblr at http://thecerealdiner.tumblr.com/. I am oh so happy with my new site and have launched it with a super awesome new recipe.
If you are all up on the social media scene you can also find me on Twitter, Pinterest and Instagram @thecerealdiner
Come visit me as I would love to say hi!
Tuesday, 5 June 2012
Wednesday, 23 May 2012
teacup cottage pie
So this will definitely be my last post on Blogger. Currently working on the layout over at my new Tumblr page to make it as pretty as possible before launching it along with a Twitter account for the cereal diner. Excitement plus!
Well I have previously expressed my love of eating things from mugs but now I have added to my love of eating from drinking vessels and have started making things in teacups. I must admit that my teacup is a rather large teacup but little ones work just as well.
I say teacups and mugs should be celebrated and embraced and everything should be enjoyed from them, not just tea and coffee and sometimes wine.
 1 medium potato, peel & quarter
150 grams of lean beef mince
1 teaspoon of olive oil
1/2 small brown onion, finely diced
1 small carrot, diced
2 button mushrooms, diced
1/4 cup of peas
2 tablespoons of tomato sauce
1/2 a teaspoon of Vegemite (trust me)
1 teaspoon of stock powder
1/4 cup of cold water
S&P
2 tablespoons of parsley, chopped
2 tablespoons of milk
1 tablespoon of grated cheese
Small handful of salad leaves
1 teaspoon of additional olive oil
1 teaspoon of balsamic vinegar
Preheat the oven to 200 degrees celsius. Grease your teacup.Put the potato in a small pot of water and put on a high heat to cook whilst you prepare the mince mixture.
 Heat the teaspoon of olive oil in a pot on a medium heat and sauté the onion until soft, add the beef mince and stir until starting to brown whilst trying to smoosh out any lumps. Add carrot, mushrooms, peas, sauce, Vegemite, stock powder, cold water and a good pinch of S&P. Stir together and then add the water. Cook until the carrots soften and the liquid reduces - but don't let it become too dry. Take off the heat and stir through the parsley.
Fill your greased up teacup 3/4 full with the mince mixture.
Check the potato and once cooked, strain and mash with the milk and then spoon on top of the mince mixture in the teacup. Sprinkle the grated cheese on top of the potato and pop in to the oven until the cheese has melted and become golden brown. Remove the pie from the oven remembering that the teacup will be mega hot. Let the teacup cool down before serving.
Dress the salad leaves with the additional olive oil and the balsamic vinegar and serve on the side with your teacup cottage pie. I used baby spinach and radicchio leaves, which I am totes digging at the moment.

Friday, 4 May 2012
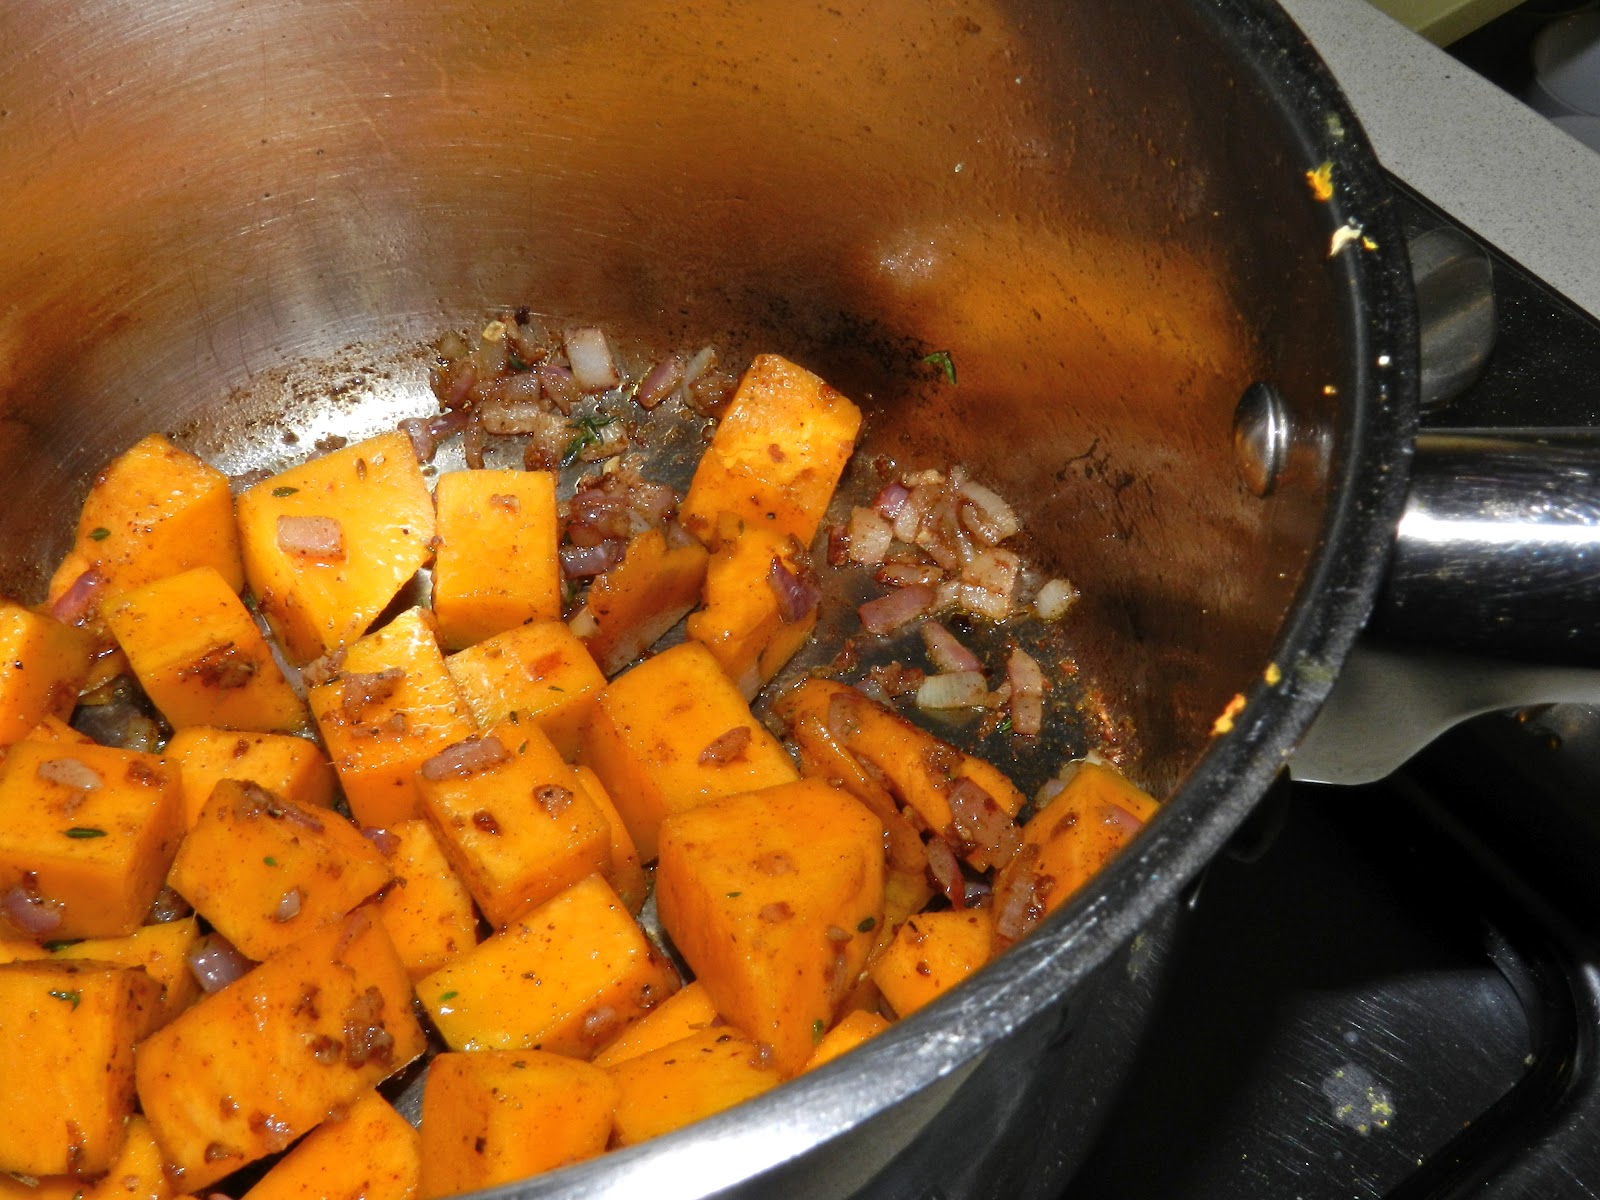
spiced (but not spicy) pumpkin soup

This pumpkin soup is kind of like the chai tea of soups, it is warming, slightly spiced and super comforting. I am rather fond of it. And even better is that it literally takes under 30 minutes to make. It is the perfect cold winter mid week or lazy Sunday treat.
I would like like to say it is a recipe past down from generation to generation but it isn't. It was kind of passed down to me by my Dad, Barry. Dad's pumpkin soup was one of the first things I ever learnt to cook and I remember being super proud that I could make something as simple as pumpkin soup taste super rad. I have made a few changes to the recipe since Dad gave it to me all those years ago but I am pretty happy with the way it is now.
2 cups of pumpkin, cubed
2 cups of vegetable stock
1 tablespoon of olive oil
1/2 a small onion, finely diced
1 clove of garlic, crushed
1 teaspoon of fresh ginger, grated
1/2 teaspoon of ground cinnamon
1/4 teaspoon of ground allspice
1/4 teaspoon of ground cumin seeds
1 teaspoon of thyme leaves1 spring onion, finely sliced (optional)
1 tablespoon of natural yoghurt (optional)
1/2 a cup of cooked brown rice (optional)
 Heat the oil in a medium sized pot and sauté the onion, garlic and ginger. Once the onion starts to become opaque add in the cinnamon, allspice and ground cumin seeds and continuously stir until a paste like consistency. Add the cubed pumpkin and stir until the pumpkin is coated in the spice mix. Pour in the stock and turn the heat down to a medium heat and simmer for about 15 minutes. Stir in the thyme leaves and continue to cook until the pumpkin has broken down and your soup is now a thickish consistency.
I don't know why but I really like to eat my pumpkin soup with some brown rice in the bottom of the bowl, this is totes optional but I find it adds a bit of body to it. I also LOVE to eat my soup with a dollop of yoghurt on top and top it off with the sliced spring onions to add some texture.

Wednesday, 18 April 2012
herb crumbed lamb cutlets with creamy polenta & kale
This week I thought I would try out some ingredients that I haven't cooked with before and gee whiz I am rather happy that I did. So on Saturday morning I packed up my new housemates and took them for a little excursion to the local farmer markets at Eveleigh. Whilst strolling around and viewing all the amazing produce on offer I came across some kale which I have been on the hunt for but unable to obtain at the local supermarkets. I read many recipes for this "super food" but I want to experience it for its self so just fried it quickly with a bit of salt and pepper and it is awesome. If you can't get a hold of any kale I think that using silverbeet or the original kind of spinach (not baby spinach) would achieve a similiar result.
Polenta was next on my list of things I have been wanting to cook but haven't gotten around to so this week I just did it. And am happy I did it because it is tasty and beyond easy. It literally takes 5 minutes! Now after using it once I think that there are so many possibilities to utilise this corny treat.
This dish is super quick and super impressive. Would be great to cook if you have people over as you just multiple everything below by the number of people you are serving.
So, the moral of today's story is that you should always try and step out of your comfort zone and try new things because sometimes you might surprise yourself and be quite delighted by the end result and if things don't work out then at least you can say you tried. I say YAY to new stuff and things.

 Heat a fry pan to a medium low heat. I sprayed the cutlets directly with spray oil rather than spraying the pan to try and keep my oil usage to a minimum. Once the pan is heated start cooking the cutlets. Make sure that you monitor them as they can burn easily. I cooked mine for about 3-4 minutes on each side as I don't like me lamb overcooked.
Whilst the lamb is cooking bring the water and stock to the boil in a small pot. Once the liquid is boiling, slowly pour in the polenta and continously stir. You need to continously stir to ensure that there are no lumps and your polenta is smooth. The polenta will absorb all of the water and become a thick gluggy consistency. Remove from the heat after 5 minutes and stir through the butter and parmesan.
By now the lamb should be cooked, remove the cutlets from the pan and set them aside for 5 minutes to rest.
 Whilst the lamb is resting, heat the same fry pan up to a medium high heat, no need to clean the pan as the crumbs and juices will add to the flavour of the kale. With the kale, remove the ends of the stems and slice the leaves in to large shreds. Throw in to the fry pan with a spray of oil and a good crack of salt and pepper. Stir the leaves for about a minute and then add about 2 tablespoons of water to the pan to help soften the kale leaves. Once the leaves are softened you can serve up.
Give the polenta a good stir, you made need to pop it back on the the heat for about a minute to soften it up again. Spoon the polenta on to the bottom of your plate, place the kale on to the polenta followed by the lamb cutlets on top of the kale. Eat whilst hot as the polenta will become rather gloopy when cold.

Polenta was next on my list of things I have been wanting to cook but haven't gotten around to so this week I just did it. And am happy I did it because it is tasty and beyond easy. It literally takes 5 minutes! Now after using it once I think that there are so many possibilities to utilise this corny treat.
This dish is super quick and super impressive. Would be great to cook if you have people over as you just multiple everything below by the number of people you are serving.
So, the moral of today's story is that you should always try and step out of your comfort zone and try new things because sometimes you might surprise yourself and be quite delighted by the end result and if things don't work out then at least you can say you tried. I say YAY to new stuff and things.

2 lamb cutlets
1/4 a cup of breadcrumbs
10 mint leaves
3 sprigs of thyme
zest of 1/2 a lemon
1 egg
1 cup of water
1/2 teaspoon of vegetable stock
1/4 cup of polenta
1 tablespoon of parmesan, finely grated
1/2 a teaspoon of butter
1/2 a bunch of kale
S&P
Remove the thyme leaves from the sprigs and finely chop them with the mint and lemon zest. Mix the herbs and zest with the breadcrumbs in a shallow bowl. In another shallow bowl lightly beat the egg. Take the cutlets and slightly flatten them out by bashing them with the palm of your hand or a meat mallet. Dip the cutlets in to the beaten egg first and then place in them in the crumbs and completely cover them with the crumb mixture. If you like you can do a second egg dip and crumb coating but I just did the one.
 Heat a fry pan to a medium low heat. I sprayed the cutlets directly with spray oil rather than spraying the pan to try and keep my oil usage to a minimum. Once the pan is heated start cooking the cutlets. Make sure that you monitor them as they can burn easily. I cooked mine for about 3-4 minutes on each side as I don't like me lamb overcooked.
Whilst the lamb is cooking bring the water and stock to the boil in a small pot. Once the liquid is boiling, slowly pour in the polenta and continously stir. You need to
 continously stir to ensure that there are no lumps and your polenta is smooth. The polenta will absorb all of the water and become a thick gluggy consistency. Remove from the heat after 5 minutes and stir through the butter and parmesan.
 By now the lamb should be cooked, remove the cutlets from the pan and set them aside for 5 minutes to rest.
 Whilst the lamb is resting, heat the same fry pan up to a medium high heat, no need to clean the pan as the crumbs and juices will add to the flavour of the kale. With the kale, remove the ends of the stems and slice the leaves in to large shreds. Throw in to the fry pan with a spray of oil and a good crack of salt and pepper. Stir the leaves for about a minute and then add about 2 tablespoons of water to the pan to help soften the kale leaves. Once the leaves are softened you can serve up.
Give the polenta a good stir, you made need to pop it back on the the heat for about a minute to soften it up again. Spoon the polenta on to the bottom of your plate, place the kale on to the polenta followed by the lamb cutlets on top of the kale. Eat whilst hot as the polenta will become rather gloopy when cold.
Thursday, 12 April 2012
chicken noodle soup or as i like to call it: an edible hug
 Apologies for the recent blogging hiatus but the last couple of weeks I have been overwhelmed with a disgusting, putrid, viral bug of some form so haven't had the energy to focus on much other than getting well. When you're single being sick really is the pits. This was honestly the first time that I really missed being in a relationship and having someone around to be able to do pharmacy trips and make me chicken noodle soup, which is the only thing I felt like eating during my days being bedridden but I just didn't have the energy to go shopping let alone cook.
 But now that I am better I am able to make it for myself and feel happy about being single again. It also coincides perfectly with this shitty change of weather in Sydney. Brrrrrrrrr and Grrrrrrrrrr.
So when I originally went shopping for this I was on the hunt for Alphabet Noodles - what the heck happened to Alphabet Noodles??? Why would people stop making them? Nothing beats getting a bowl of soup and slopping it everywhere whilst trying to spell out your name on the table. It is a travesty I tells you! I think I will write a letter of complaint, gosh dang! So I got the next best thing - Dinosaur Noodles.
 Stock
Stock1 chicken Maryland
1/2 an onion
1 stick of celery
1/2 a large carrot
2 cups of salt reduced chicken stock
2 cups of water
4 sprigs of thyme
2 sprigs of parsley
S&P
Soup
Chicken from the Maryland for the stock
1/2 a large carrot, finely diced
1/2 a cob of corn, sliced from the cob
1 stick of celery, finely sliced
2 sprigs of parsley, roughly chopped
S&P1/2 cup of Dinosaur Noodles
Pre-warning: I recommend cooking the stock the night before you want to make the soup so that the night you actually cook the soup it doesn't take hours to create.
Take all of the stock ingredients and place them in a pot, cover and place on the lowest possible heat. I put my stock on for about 2 hours whilst I went grocery shopping and cooked dinner for the evening.


After 2 hours let the stock cool, transfer to a contain and place in the fridge overnight. By cooling in the fridge it will separate the fat from the stock. When you go to cook your soup remove the stock from the fridge and skim and discard the fat off the top of the stock using a teaspoon. The stock will now have solidified so will be like jelly, this is a sign of a good stock. Remove the Maryland from the jelly, place the jelly and stock veges in to a pot with 2 cups of water and place on a low heat for about 15 minutes so that the jelly completely dissolves.
Whilst the stock is on the heat, remove the skin from the Maryland and remove the meat from the bones, the meat may look discoloured but it should only be due to the cooking process and then being cooled overnight, if your chicken was fresh there won't be any issue. Tear the chicken meat in to small pieces for the soup. Once the stock is heated take a sieve and strain the stock in to a bowl, separating all of the vegetables and other ingredients which can now be thrown out.
Take your separated stock and place in the pot again and add the torn chicken pieces, carrot, corn, celery and 1/2 a cup of water. Put on a medium heat and cook for 20 minutes.
When the soup is cooking bring a pot of water to the boil and cook the Dinosaur Noodles. I like to cook my noodles separately so that it doesn't make the soup too starchy and I can ensure that the noodles aren't overcooked. Once the noodles are done strain them and add them to the soup and remove the soup from the heat. Add the chopped parsley and a good crack of salt and pepper.
Whilst the soup cools a little, pop a bit of toast in to the toaster and cut yourself up some cute little soldiers for dunking in the broth and you're ready to go.
I don't own any soup bowls at the moment so I just ate straight from the pot - why you ask - because it doesn't even matter when I am the only one eating it.

Sunday, 18 March 2012
a single's Sunday roast

I now think that Sunday roasts will again be a regular occurrence in my life.
1 chicken Maryland, skin on
1 small potato, peeled
1 carrot (I used purple carrot cause I love it)
 1/2 brown onion, cut in to wedges
2 cloves of garlic
1/2 a cup of peas
A few sprigs of fresh thyme
Olive oil
1 cup of salt reduced chicken stock
1 mushroom, diced
Salt & pepper
Preheat your oven to 190 degrees. Cut your carrot in to quarters and lay on a small baking tray along with the wedged onion and a about 3 sprigs of thyme. Place your chicken Maryland on top of the carrot and onion, drizzle some oil over the top of the chicken, some leaves of thyme removed from the sprigs and a good crack of salt and pepper. Take the peeled potato, cut in half and then make lots of thin slices across the top but don't go all the way through as you want the half to stay intact, place on another tray lined with some baking paper and drizzle a little bit of oil over the top. Place both the chicken and the potato trays in the oven, have the chicken tray on a higher rack than the potato. Cook for around 30 minutes.
 Once the chicken is done, put the peas on to cook. Turn the oven off and remove the chicken and potatoes plate them along with the carrots. Take a fry pan, put it on a high heat and place all of the chicken juices, onion, garlic, oil and thyme from the baking tray in to the pan. As this starts to cook add the diced mushroom. Cook this off for a couple of minutes and then tip in the cup of salt reduced stock. Bring this to the boil so that the gravy starts to reduce. When you use stock in an instance where it will be reduced I always recommend using salt reduced stock because as the stock reduces it becomes stronger in flavour and if you don't use the salt reduced kind than your sauce will be very salty. Whilst cooking the gravy mash up the garlic cloves if they are still whole and remove any twigs from the thyme. De leaf another 2 thyme sprigs and add the leaves just before the gravy is finished. Once you are happy with the consistency of the gravy remove it from the heat. Now drain your peas and plate them and then tip the gravy over the chicken and vegetables and serve.
Monday, 12 March 2012
chorizo & tomato stew with cous cous & poached egg

This is one of those dishes where you can just use whatevs - if you don't have ground cumin then use curry powder - if you don't have cous cous then use rice. It is a great dish for those slap together meals when you don't feel like doing the supermarket mission.
1/2 chorizo, cut into small pieces
1/2 small brown onion, diced
1 small clove of garlic, crushed
1/2 teaspoon of stock powder (any flavour)
1/4 teaspoon of ground cumin seeds
1/4 teaspoon of paprika
1/4 teaspoon of cinnamon
1/2 a 400g can of tomatoes (I used cherry tomatoes)
1/2 a cup of cold water
1/2 teaspoon of sugar
2 tablespoons of basil leaves, roughly shredded
1 tablespoon of natural unsweetened yoghurt
1 free range egg
1 tablespoon of vinegar
1/4 cup of cous cous
1/4 cup of boiling water


In a bowl place the cous cous and the boiling water, cover with a lid, plastic wrap or plate and set aside for 5 minutes. Cous cous is so easy, all you have to remember is equal parts cous cous to equal parts boiling water.
Remove the stew from the heat and stir through half of the shredded basil and the tablespoon of yoghurt. Serve the stew straight on top of the cous cous that should now be ready, place the poached egg on top of the stew and sprinkle the remaining basil leaves over the top. Add a good crack of salt and pepper and you are done.

Tuesday, 6 March 2012
roasted cherry tomato, goat's cheese & anchovy pasta
 I know there are a whole heap of you already turning your nose up to the anchovy but you got to back up and leave your judgement at the door. I understand that some folks don't like biting in to a mini fish fillet on their pizza but when you use anchovies in a sauce they pretty much melt away and leave behind a lovely salty goodness.
If you know me you will know that I have a love for anything that is tiny or miniature, which is why I think this pasta is so rad, other than the fact that it tastes awesome, but also because its full of baby tomatoes and teeny tiny fish fillets. Yay for loving little things.
This is another recipe in which you can mix and match things up, if you really hate anchovies you could use proscuitto or chorizo instead, or if you don't have any goats cheese you could use feta or bocconcini.

1/2 a punnet of cherry tomatoes
1 teaspoon of olive oil
1/2 a teaspoon of brown sugar
1 clove of garlic
50 grams of goats cheese
15 basil leaves, torn
3 anchovy fillets
1/4 packet of wholemeal spaghetti
S&P
Preheat the oven to 200 degrees. Mix the olive oil, sugar and garlic in a bowl until it becomes a paste, add the cherry tomatoes and coat them thoroughly. Cover a baking tray with baking paper and tip the cherry tomatoes and mixtures on to the tray and bake for 25 minutes or until cooked and caramelised.

Drain your pasta, leaving it a little wet still. Place in to the large bowl and mix together with all other ingredients and voila, you're done.
Wednesday, 29 February 2012
balsamic strawberries & marshmallow tart
 I created this recipe a couple of years ago when my friend Milton and I had a "pie off" to see who was the best pie chef and unfortunately for Milton this was a winning combination. I have since turned the pie recipe in to a tart as the marshmallows are better when they crisp up on the outside and it is always fun to talk about tarts because there is usually a bad joke involved.
5 strawberries, quartered
1 teaspoon of brown sugar
1/2 teaspoon of butter
2 1/2 large marshmallows
1/4 sheet of shortcrust pastry
Baking beads or lentils or rice for blind baking
 Preheat your oven to 180 degrees. Cut 2 pieces of baking paper so they are approximately the same size as your quarter sheet of shortcrust pastry. Take your quarter sheet of pastry and place it on one of the pieces of baking paper. Gently mould your pastry into a muffin tray, paper side down first. Once moulded in, take the other piece of baking paper and carefully place it on top of the pastry and then fill the cup shape with baking beads or lentils or rice. Place in to your preheated oven for around 15 minutes.
Whilst your pastry is blind baking, place the strawberries, vinegar, sugar and butter into a small pot and cook over a medium heat until the mixture has thickened and is kind of like runny jam.
 Remove the pastry from the oven, let cool for a couple of minutes and then carefully lift out the top sheet of baking paper and the beads/lentils/rice and discard. Fill the pastry cup with your strawberry mix so that the cup is filled about 3/4 of the way. Place the marshmallows on top of the strawberry and put back in to the oven for another 10 to 15 minutes until the marshmallows are golden and puffy.
Remove the tray from the oven and again let cool for a few minutes. Carefully lift out the tart using the baking paper and place on a plate. You will be able to easily remove the paper from the outside. Serve and eat whilst still warm as the marshmallow is stringy and gooey and good.

Wednesday, 22 February 2012
steak with mashed cannellini beans and asparagus

I am not on a crazy diet or anything but I try to keep my carbs low at night time because it really does make me feel sluggish the next morning, but gosh dang do I miss mashed potato! These mashed cannellini beans are a bloody great alternative especially when combined with the eschallot, garlic and lemon. It is kind of like eating a big mound of hommus and who doesn't like hommus?
In terms of cooking steaks, I find a number of my friends are quite intimidated by the whole process - there is no reason to be scared, it is super easy. Here is a great guide on taste.com.au which you may find useful.
1 steak (I used a yearling scotch fillet)
1/2 bunch of asparagus, ends trimmed off
1 small clove of garlic, crushed
1 small eschallot or 1/2 small onion, diced
Juice of 1/2 a small lemon
Olive oil
1 teaspoon of butter
S&P
Crack open your can of cannellini beans, drain in a sieve or colander and then rinse under cold water. I used my remaining half a can in my salad for my work lunch so that it didn't go to waste. Set the drained and rinsed beans aside.
Heat the olive oil in a pan and cook your steak according to the above guide, or however you like to normally cook your steak.
Whilst your steak is cooking, put on a pot of water to boil.
 In another pot, melt your butter and then saute the eschallot and garlic until golden brown. Add your half can of cannellini beans and stir for around 1 or 2 minutes until the beans are sufficiently heated through, remove from heat. Tip in the lemon juice and then mash your bean mix in the pot with a fork and add a cook pinch of salt and pepper.
By now your steak should be cooked and your pot of water boiling. Remove the steak from the pan and set it aside on a plate to rest for around 5 minutes. This will help ensure that your steak is still tender as the meat constricts during cooking so you need to let the muscle relax.
Place your asparagus stalks in to the boiling water, they should only take about 1 minute to cook. Drain and plate up with your bean mash and steak.

Tuesday, 14 February 2012
happy singles appreciation day to all the solo cooks
A lot of single people don't enjoy the dreaded date of February 14, Valentine's Day. The singles of the world tend to get frustrated seeing all the mooshy things that the couples of the world are doing. I for one, am not worried about Valentine's Day because I LOVE being single. Embrace it! Celebrate the fact that you aren't going to end up getting some stinking bottle of perfume that you hate the smell of and have to wear for the next couple of weeks so you don't offend anyone. Celebrate the fact that tonight you can go and hang out with all of your lovely lady/men friends and have a good laugh. Celebrate the fact that you get to sleep diagonal across your bed. Celebrate the fact that you don't have anyone leaving their dirty clothes on the floor. Celebrate the fact that you can do whatever you want and there is no one to stop you.
I don't have a recipe of my own to post tonight as I am going to go and have a nice G&T with some of my favourite single ladies but I do have a recipe to share with you from Monique at Fat and Happy - Broken-Hearted Chocolate Black Pepper Cookies. These look scrumptious and I will definitely be giving them a try real soon.
http://www.fatandhappyblog.com/2011/02/broken-hearted-chocolate-black-pepper.html

Tuesday, 7 February 2012
pumpkin & goats cheese ravioli with spinach sauce
 This one goes out to all my vegetarian friends.
I understand and appreciate why vegetarians steer clear of chomping down on a chop but I really like chops and all other forms of meat (except for duck, eating ducks should be illegal). I believe that if you are a meat eater you should educate yourself on the processes used to deliver the meat in the nice little packages you find lining the supermarket fridges. When possible I purchase free range/organic/sustainable meat to try and ensure that the animal has had a better life and the impact on the environment is decreased.
Anyways, who needs to be a meat eater when you can chow down on these delicious little packages!
1 1/2 cups of pumpkin, cut into 1cm cubes
1 tablespoon of olive oil
40 grams of goats cheese
1 packet of wonton or gow gee wrappers (freeze any that you do not use)
1/4 cup of liquid vegetable stock
4 cubes of frozen spinach, approximately 85 grams
1/4 cup of extra light cream
1 sprig of fresh thyme, stems removed
S&P
 Preheat your oven to 180 degrees. Mix the cubed pumpkin and olive oil together on your baking tray and bake for around 30 minutes, or until nicely golden and soft (you can also roast your pumpkin the day before to save on time, just cover and refrigerate until needed). Let your pumpkin cool and mash together with the goats cheese.
Separate a few of the wonton wrappers. I used 7 wrappers but you may need more or less. Spoon 1 teaspoon of the pumpkin and goats cheese mixture on to the middle of the wonton wrappers until you have used all your mixture. Have a small dish of cold water ready and dip your finger into the water and then run your finger along the 2 top sides of your wonton wrapper. Bring the bottom corner up to the top corner and then carefully pinch the top edges together whilst also pushing out any air. You need to try and ensure all air is removed as when heated it can cause a blow out. You can leave in the shape of a triangle or you can bring the 2 side corners together and pinch them to hold in place. You now have your little raviolis, set them aside.

Melt the frozen spinach cubes in a pot with the vegetable stock until the cubes are completely defrosted. Add your cream, thyme leaves and a pinch of salt and pepper. Cook on a medium heat for around 3 minutes, stirring so that it does not stick to the pan. Taste your sauce as you may need to add more seasoning. Remove from the heat.
Bring a pot of water to the boil, ensuring there is sufficient water so that your little parcels can move around freely. Once boiling carefully pop your ravioli into the water and cook for about 2 minutes. Do not overcook these or they will become soggy and tear. The ravioli should be just cooked and the filling warmed. Drain your ravioli.
Put your sauce back on the heat for about 1 minute and carefully stir through your ravioli so sufficiently coated, slide into a bowl and enjoy whilst still hot.

Sunday, 29 January 2012
lamb, beetroot and broad bean salad
If you haven't cooked with broad beans before, you need to get over all this shit cause these little guys are super tasty, buttery, easy to use and good for you. Normally I would use fresh broad beans from the pod and shell them myself which is a really lovely and honest experience but unfortunately they have just gone out of season. Thankfully you can purchase broad beans frozen in nearly all supermarkets now.
Another thing about this dish is that when you eat fresh beetroot and nature calls the next day, don't forget that it isn't blood! You are not dying! It is just from the fresh beetroot.
 1 medium sized beetroot
150g of lamb fillet (backstrap)
1 garlic clove, crushed
Juice of 1/2 a lemon
1 tablespoon of olive oil
1 cup of frozen broad beans
2 tablespoons of natural yoghurt
10 mint leaves, shredded finely
1 teaspoon of honey
S&P
1 cup of baby spinach leaves
Preheat your oven to 180 degrees. Peel your beetroot and wrap it in foil, adding about 1/2 teaspoon of water before sealing up the foil. Cook in the oven for around 45 minutes or until just soft all the way through.
Place your lamb in a dish along with the crushed garlic, lemon juice and olive oil. Set aside.
 Cover the broad beans in some warm water for around 10 minutes just to defrost them a little. The broad beans have a husk around the outside which you need to remove. To do this just pinch the husk a little bit until it breaks and then pop your bean out, discard the empty shells. Cover the shelled beans with boiling water for around 1 minute, drain and set aside to cool.
Mix the yoghurt, honey, shredded mint leaves and a pinch of salt and pepper together. Pop back in the fridge until serving.
Remove the beetroot from the oven (leave the oven on) and carefully remove the foil, ensuring to avoid any steam. Slice the beetroot in small wedges and leave to cool.
 Heat a fry pan and sear your lamb fillet, tip the oil and lemon juice from the marinade in to the pan rather than using any additional oil. Just sear the lamb briefly to seal it and then place in the oven on a tray for around 5 minutes, or until you are satisfied with how well it is cooked. I like my lamb a bit pink still so that it remains tender and juicy.
Mix together the beetroot, broad beans and spinach and place on your plate. Thinly slice the lamb fillet and lay over the salad. Remove your yoghurt mix from the fridge and spoon over the top of the lamb. Enjoy.

Another thing about this dish is that when you eat fresh beetroot and nature calls the next day, don't forget that it isn't blood! You are not dying! It is just from the fresh beetroot.
 1 medium sized beetroot
150g of lamb fillet (backstrap)
1 garlic clove, crushed
Juice of 1/2 a lemon
1 tablespoon of olive oil
1 cup of frozen broad beans
2 tablespoons of natural yoghurt
10 mint leaves, shredded finely
1 teaspoon of honey
S&P
1 cup of baby spinach leaves
Preheat your oven to 180 degrees. Peel your beetroot and wrap it in foil, adding about 1/2 teaspoon of water before sealing up the foil. Cook in the oven for around 45 minutes or until just soft all the way through.
Place your lamb in a dish along with the crushed garlic, lemon juice and olive oil. Set aside.

Mix the yoghurt, honey, shredded mint leaves and a pinch of salt and pepper together. Pop back in the fridge until serving.
Remove the beetroot from the oven (leave the oven on) and carefully remove the foil, ensuring to avoid any steam. Slice the beetroot in small wedges and leave to cool.
 Heat a fry pan and sear your lamb fillet, tip the oil and lemon juice from the marinade in to the pan rather than using any additional oil. Just sear the lamb briefly to seal it and then place in the oven on a tray for around 5 minutes, or until you are satisfied with how well it is cooked. I like my lamb a bit pink still so that it remains tender and juicy.
Mix together the beetroot, broad beans and spinach and place on your plate. Thinly slice the lamb fillet and lay over the salad. Remove your yoghurt mix from the fridge and spoon over the top of the lamb. Enjoy.

Tuesday, 24 January 2012
crispy skin salmon with poached egg and asparagus
 I haven't got much to write this week other than you need get this dish in your belly! Stat! It is so simple, quick and super tasty. The oozey egg over the salmon and asparagus is near perfect.
The one thing that I cannot stress enough about this dish is: DO NOT OVERCOOK YOUR FISH! You may think that it is raw on the inside but if you purchase good quality fish then it is ok to be a little undercooked and it really does make your salmon experience more enjoyable.
1 salmon fillet, skin on
1/2 bunch of asparagus
1 free range egg
1 lemon
A few sprigs of parsley
1 tablespoon of white vinegar
Dash of olive oil
S&P
 Finely chop your parsley, zest your lemon and mix together in a small bowl with a pinch of salt and pepper. Set aside.
Bring one pot of water to the boil and blanch your asparagus until just tender. Run the asparagus spears under cold water to stop the cooking process, drain and lay on your serving plate.
Bring another pot of water to the boil for your egg. Once boiling, turn the water down so that it is a gentle simmer and add your white vinegar.
Whilst your water is coming to a simmer heat the olive oil in a frying pan on a high heat. Lay your salmon fillet in to the hot oil, skin side down. Cook for a few minutes until your skin is golden and crispy but not burnt.

Now whilst the salmon skin is crisping in the pan crack your egg on to a small plate. Create a swirl in your simmering water and gently slide the egg from the plate in to the water. Cook for around 2-3 minutes for a nice oozing yolk.
Whilst your egg is poaching, turn down the heat of your fry pan to a medium/low heat and flip your fish and cook for another few minutes until the centre is heated and slightly opaque. Remember, do not overcook your salmon. Remove from the pan and place straight on to your asparagus spears.
Remove the egg from the water with a slotted spoon and place on paper towel to remove any excess water. Lay the egg on top of the salmon and sprinkle your parsley and lemon rind mix all over your dish. Serve with a slice of lemon for an extra bit of freshness.

Tuesday, 17 January 2012
zucchini pizza base with prosciutto and bocconcini
The problem = I love pizzas but I hate immensely dislike greasy, oily bases. The solution = pizza bases made from grated zucchini.
This is a winning recipe and I can not recommend it more. It is great to finally be able to enjoy a nice pizza without the guilt and I honestly think that this pizza base tastes better than a regular takeaway pizza. The zucchini provides a great flavour and crisps up well.
This base recipe can be used with any topping combination that you like. Also, if you want an even quicker dinner you can buy tomato paste for the sauce rather than make it yourself but trust me, this sauce recipe is better than anything you can get out of a jar!
Hot tip of the week: when cooking with tomatoes I add a little bit of sugar as it helps to counteract the acidity.
 Sauce
Sauce
1/2 a punnet of cherry tomatoes - approx 15
1/4 cup of water
1 teaspoon of sugar
Good pinch of pepper
5 leaves of basil, shredded
Base
1 small zucchini, grated
1 small free range egg, beaten
50g light mozzarella, grated
Topping
2 slices of prosciutto
5 balls of baby bocconcini
5 basil leaves
Preheat your oven to 190 degrees.
 Cut the cherry tomatoes into quarters and put in a small pot with the water, sugar and pepper. Put on a medium/high heat and cook until tomatoes have broken down and the sauce is quite thick. Approximately 10 minutes. Remove sauce from heat and stir through the shredded basil leaves. Do not add salt to your sauce as there will be sufficient salt from the cheese and prosciutto.
 Whilst the sauce is cooking mix the grated zucchini, beaten egg and grated mozzarella. Tip the mixture on to a flat tray covered in baking paper and spread out in to a thin layer. Put in the oven and cook for around 15 minutes or until golden brown, ensure to turn the base half way through if your oven does not cook evenly. Remove from the oven and slide from the tray on to the bench to cool it down a little bit before adding the topping.
Turn your over up to 220 degrees.
Once your base has cooled for a few minutes, spread the tomato sauce over the top, place the basil leaves on the sauce, tear up your prosciutto in to small pieces and lay over the basil and break or slice your baby bocconcini balls in half and pop them on top of the prosciutto. Slide your pizza on the baking paper back on to your tray and place the pizza back in to the oven for about 10 minutes or until the bocconcini has melted and slightly browned.
Super easy, super quick and super tasty.

This is a winning recipe and I can not recommend it more. It is great to finally be able to enjoy a nice pizza without the guilt and I honestly think that this pizza base tastes better than a regular takeaway pizza. The zucchini provides a great flavour and crisps up well.
This base recipe can be used with any topping combination that you like. Also, if you want an even quicker dinner you can buy tomato paste for the sauce rather than make it yourself but trust me, this sauce recipe is better than anything you can get out of a jar!
Hot tip of the week: when cooking with tomatoes I add a little bit of sugar as it helps to counteract the acidity.
 Sauce
Sauce1/2 a punnet of cherry tomatoes - approx 15
1/4 cup of water
1 teaspoon of sugar
Good pinch of pepper
5 leaves of basil, shredded
Base
1 small zucchini, grated
1 small free range egg, beaten
50g light mozzarella, grated
Topping
2 slices of prosciutto
5 balls of baby bocconcini
5 basil leaves
Preheat your oven to 190 degrees.
 Cut the cherry tomatoes into quarters and put in a small pot with the water, sugar and pepper. Put on a medium/high heat and cook until tomatoes have broken down and the sauce is quite thick. Approximately 10 minutes. Remove sauce from heat and stir through the shredded basil leaves. Do not add salt to your sauce as there will be sufficient salt from the cheese and prosciutto.
Turn your over up to 220 degrees.
Once your base has cooled for a few minutes, spread the tomato sauce over the top, place the basil leaves on the sauce, tear up your prosciutto in to small pieces and lay over the basil and break or slice your baby bocconcini balls in half and pop them on top of the prosciutto. Slide your pizza on the baking paper back on to your tray and place the pizza back in to the oven for about 10 minutes or until the bocconcini has melted and slightly browned.
Super easy, super quick and super tasty.

Subscribe to:
Posts (Atom)